eu preciso compartilhar um comentário que recebi no meu blog com vcs:
a pessoa não se identificou, ela escreveu como Anonimo e comentou que chegou no meu blog através do blog train e que ficou entretida por duas horas lendo meu blog!! E ela voltou no dia seguinte pra agradecer as tantas dicas que ela adorou!
This comment on my blog I have to share with you:
I have to share a wonderful comment I received here at my blog. This "thank you" make me go ahead and share with you more tips in English/ Portuguese.
The girl wrote me as anonymous the following text:
Anônimo deixou um novo comentário sobre a sua postagem "Scrapbooking Tutorial: 3D Letters in Power Point":
Thank You very much for a great tutorial.
I came yesterday to get the blog train and got so into reading your blog and the tuts. All of a sudden it was 2 hours later and I had to rush to pick up my son. I don't think I even said Thank You yesterday. I owe you many many Thanks. I really appreciate you taking the time and offering us so much! Thank You!
Adorei a experiência!
This was the first time I've participated on a blog train and I love it!!
How to make 3D Letters with Illustrator:
Como fazer o efeito 3D em Letras, usando o Adobe Illustrator
And continuing the 3 D effects tutorial, now doing it with Illustrator:
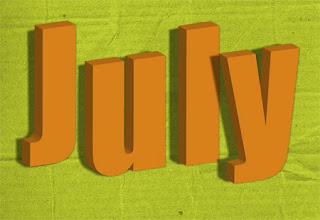 Above is the sample for a word with one direct 3D effect and below, a sample where each letter became an individual and different 3D effect.
Acima tem um exemplo de uma palavra inteira com o efeito 3D e abaixo um exemplo onde cada letra recebe um efeito 3D individual e de direção diferente.

Adobe Illustrator:
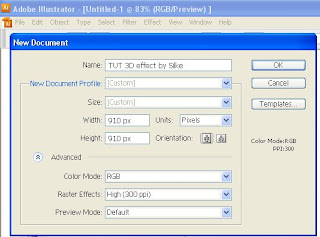
You have to open a new document (web document - 300 dpi):
abra o Adobe Illustrator conf. abaixo:
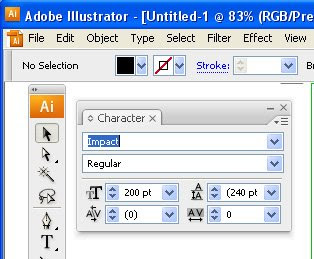
 And open the character set - ctrl + T - abra a caixa de texto (use a tecla CTRL + T)
Set the font to IMPACT - size 200 pt
And write the word you want to give the effect: I wrote July.
Change color (window > Swatches) of the font to an orange or other color (light colors - not dark!!)
Escreva a palavra JULY (ou qq palavra) e abra a caixa das cores (swatches) e clique na cor laranja. (window > Swatches)
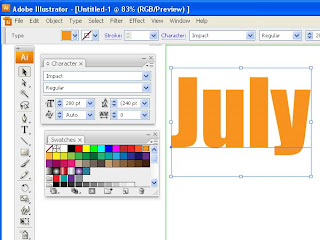
Now go to Effect > 3D > Extrude and Bevel
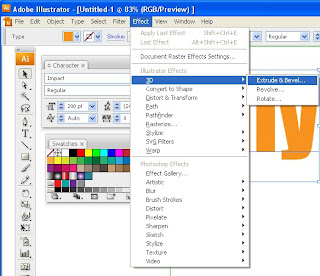
And set the options like here below (you can click the image to see larger). Siga conf. abaixo
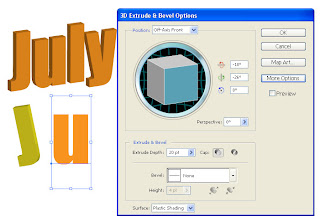 To create a messy letter block, you have to create only one letter at time and apply different 3 D effect for each. In the dialog box click on the 3D block icon and drag and rotate. Play with the settings.
Click and change the color as many times you wish! (or the font).
Para criar uma série de letras com efeitos 3D de diferentes direções vc tem que aplicar o efeito letra por letra. Escreva apenas uma letra e altere cada vez a direção do extrude clicando no ícone do cubo da caixa de diálogo e arraste e gire à vontade. Vá brincando com o efeito. Altere a cor e a fonte sempre que quiser aqui.
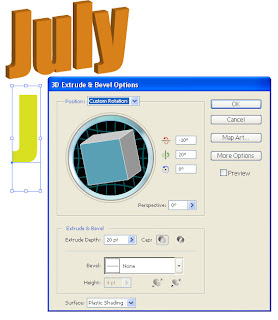 We are going to move all letters in order to mantain a distance between them, and to save as a PNG file (with transparent background) So you can later easily cut out each letter to work with individual files in Photoshop.
Antes de passar o arquivo para o Photoshop vc tem que separar um pouco as letras, facilitando para que possam ser recortadas individualmente! Clique na seta PRETA e arraste cada letra.
Se vc criou uma palavra inteira, faça espaços entre letras!
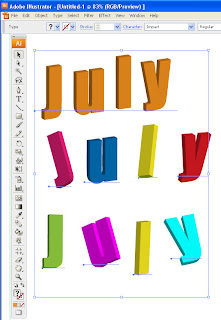 Now go to File - EXPORT - arquivo exportar
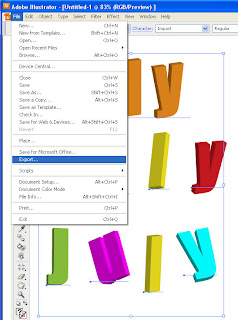 and set the file type option to PNG... como PNG com fundo transparente
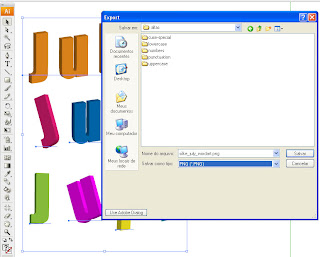 ...with transparent background, like image below:
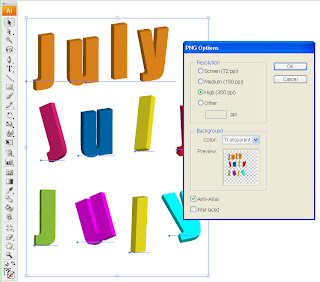 Close Illustrator - saving the file. Important:
KEEP YOUR ILLUSTRATOR FILE AS A BASIC WORK FILE:
Remember to save your work in Illustrator, because this is an important vector file and allow font changes and resizing. You can go back any time and make new 3D work with other settings and other fonts.
Salve seu trabalho no Illustrator e sempre que quiser criar um novo bloco de texto em 3D esse arquivo vai servir como base. Altere cores e fonte e vc terá outro resultado!!
Now open this new PNG file with Photoshop:
Abra o arquivo (PNG) recém-exportado no Photoshop
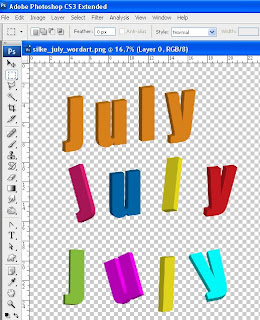
Set each letter in individual layers and apply shadow (with distort and wrap effect on each letter!).
Please comment if you like it, this motivates me to make new tutorials for you!
E RECORTE E COLE cada letra para que fiquem em camadas individuais. Aplique sombras a cada letra.
 Next post I'm going to show you how to apply a scrapbook paper on the font face!
No próximo post eu vou mostrar como aplicar na face das letras um papel de scrapbooking!
Aqui abaixo um recado para as americanas que festejam o dia 4 de Julho! E no final do post tem uma action freebie para vcs!!
Comentem, por favor, porque são os comentários que nos impulsionam a oferecer novas dicas e freebies!
***** bom scrap!*****
4th of July
I hope that all my USA scrap friends had a great weekend with happy festivities and family fun!!
This was the first time I tried a blue - red - white kit, and I have to confess, it was hard for me to find the right harmony and to fit everything together. At the end I found that the result was a great kit, principally after this wonderful, eye catching layout from my dear CT Elaine (please leave her some love here):
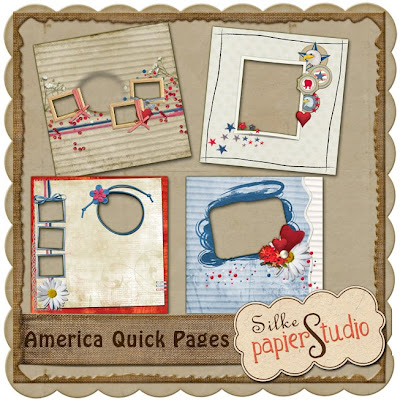
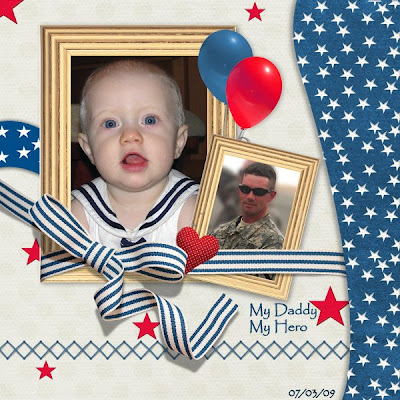 And here are the Quick Pages I did with this kit:
 here are the papers:
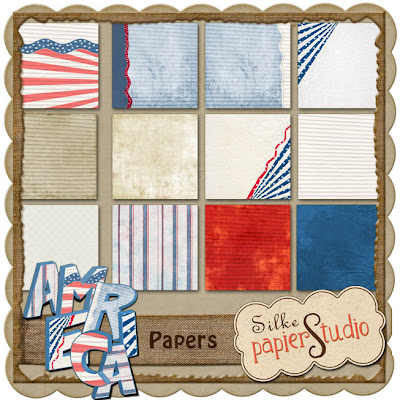 The whole kit:
And here is a small action ( FREE ) including a set of button templates:


8 comentários:
Muuuuuuuuuuuiiiito obrigada!
Não deixo de checar suas novidades pq sei que são muito boas, de grd valor, principalmente pra nós que estamos iniciando na "arte digital".
EU adoro ILLUSTRATOR! Tenho feito alguns trabalhos nele e postado como freebie no digishoptalk e no meu blog. Mais uma vez obrigada!
Bjs
Thank you so much for this Freebie. I want to let you know that I posted a link to your blog in Creative Busy Hands Scrapbook Freebies Search List, under the Elements or Papers post on Jul. 06, 2009. Thanks again.
Thanks for the cool action! I can tell I'm gonna spend a lot of time on your blog! I've bookmarked you.
Silkinha, o blog tá lindo!
Não sabia que vc tinha participado do blogtrain.. como foi?!
acho que no próximo eu tb tô lá..
Ahh e eu tb passo horas lendo o seu blog quando venho aqui!!!
Silke! Amei o tutorial! Obrigada e parabéns pelo seu blog! Acompanho a anos!!! beijos
Debora Pas
Cute! Thank you!
Você salvou minha vida como design, obrigado. <3
Thank you so much for this great tutorial!
Marilyn
Postar um comentário