
Sempre vou procurar postar em português para vocês, mas muitas vezes meus tutoriais são auto-explicativos pelo passo a passo que eu crio e dá pra ver as imagens e adivinhar os comandos - não é? E também temos o tradutor do google que tá ali do lado e ajuda um pouco!!
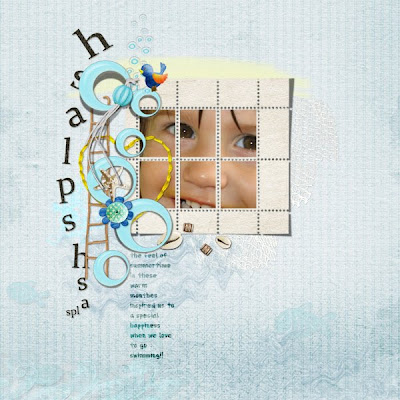
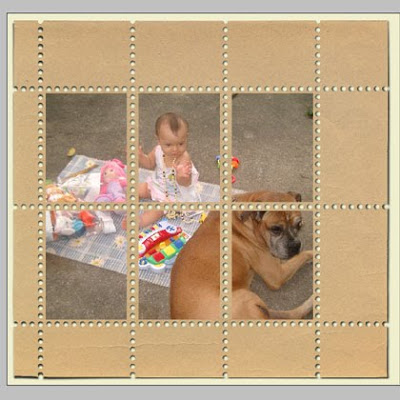
Hoje vamos ver como se faz uma moldura pra 4 fotos simulando uma folha de selos.
 Credits: layout and postage sheet paper by me, background paper and most elements from Pavlinka Summer on the Beach and Noah kits at SNT.
Credits: layout and postage sheet paper by me, background paper and most elements from Pavlinka Summer on the Beach and Noah kits at SNT. Bird, stitched heart and flower from Cucciola Designs - Easter Kit - and wordart and 2 sea elements from Kasia Sea Stories.

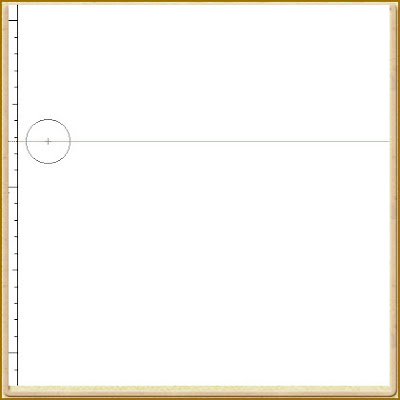
2- See the blue guide lines below that you set by click and drag them from the rules.
 6- Now you have to click on the Brush Tool and position it on the blue guide line.
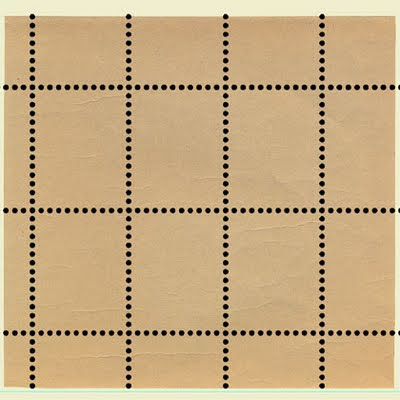
 Automatically PS will stroke with spaced dots the whole line.
 8- Duplicate this layer and turn it 90º . Drag the duplicated layer to the right. The position has to be exact when the two dots on the corner are overlayed.
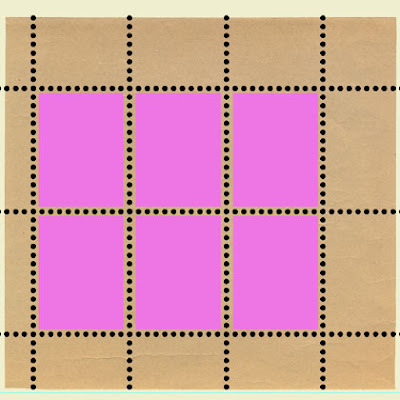
Now select the retangle shape tool and make ONE rectangle in the inside of the dots. Duplicate the rectangle layer and position it to the right side. Repeat until you have all six done.
Merge these rectangle layers.
(select the layers and with the right mouse button choose merge selected layers)
 Select the new rectangles layer by holding the CTRL key and clicking on the layer icon in the layer palette. Go to the paper layer and hit DELETE.
merge all dot layers and do the same: Select the DOT layer by holding the CTRL key and clicking on the layer icon in the layer palette. Go to the paper layer and hit DELETE.
 We are done!!!
Please, leave a comment here if you like my tutorials. I will be motivated to do more if you do so!!!
Happy Scrapping
Silke
Hi, my dear readers!
Today I'm going to show you how to make a Postage Paper Frame for 4 photos.
First of all, open a new document, 2500 x 2500 pixels and 300 dpi! Then set the rulers in order for us to control the straight brush strokes.
Today I'm going to show you how to make a Postage Paper Frame for 4 photos.
First of all, open a new document, 2500 x 2500 pixels and 300 dpi! Then set the rulers in order for us to control the straight brush strokes.

2- See the blue guide lines below that you set by click and drag them from the rules.
3- CREATE A NEW LAYER! Don't forget to create this new layer.
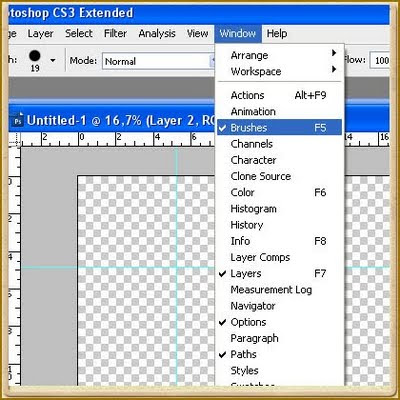
4- Click on the Brush tool and open your brush layer palette (F7)
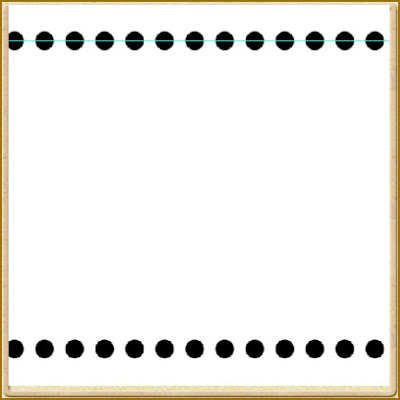
 5- And set the brush like these settings here below:
 5- And set the brush like these settings here below:
  6- Now you have to click on the Brush Tool and position it on the blue guide line.
 7- Click once and then hold shift and click again nearly to the end of the guide line.
 Automatically PS will stroke with spaced dots the whole line.
 8- Duplicate this layer and turn it 90º . Drag the duplicated layer to the right. The position has to be exact when the two dots on the corner are overlayed.
 9- Go ahead with the layer duplicating and the positioning on the exact place. Zoom the document in order to see it better. Hit [CTRL] and [+]
 Open a paper and drag it into your work below the dot layers. See my result here when I opened a paper and underlayered it here:
 Create a NEW LAYER for the photo windows.
 Open a paper and drag it into your work below the dot layers. See my result here when I opened a paper and underlayered it here:
 Create a NEW LAYER for the photo windows.
Now select the retangle shape tool and make ONE rectangle in the inside of the dots. Duplicate the rectangle layer and position it to the right side. Repeat until you have all six done.
Merge these rectangle layers.
(select the layers and with the right mouse button choose merge selected layers)
 Select the new rectangles layer by holding the CTRL key and clicking on the layer icon in the layer palette. Go to the paper layer and hit DELETE.
merge all dot layers and do the same: Select the DOT layer by holding the CTRL key and clicking on the layer icon in the layer palette. Go to the paper layer and hit DELETE.
 We are done!!!
Please, leave a comment here if you like my tutorials. I will be motivated to do more if you do so!!!
Happy Scrapping
Silke

11 comentários:
Hello,
I would like to send you an invitation to join our Designers Team, but I can't find your email in your store(s) or in your blog.
Please send me your email at: scrapbooks.gone.digital@gmail.com
Have a wonderful day!
Norma Aguilera
Excelente. Muito obrigada!
Thank you so much for this Freebie. I want to let you know that I posted a link to your blog in Creative Busy Hands Scrapbook Freebies Search List, under the Page 18 post on Aug. 31, 2009. Thanks again.
Thank you! Your blog post will be shared on
NEW CU Freebies Only Forum on Monday August 31st 2009, in this topic: Learning Center Your Place to find Commercial Use Scrap Booking Freebies!
Thanks For Sharing your Time and Talent with us!
Lauralee
Forum Owner
Arrasou!!!! Liiindo e muito legal!!!
bjuuss..
Silke qto tempo, saudades... hj passando por aqui estou vendo qta coisa linda que estou perdendo, quero voltar a praticar vc me inspira, adorei as novidades bjinhos...
Thank you so much! Great tutorial!
Thank you Silke : ) Your tutorials are as wonderfully unique as your products and actions. I simply love them,
Dieuwke
Thank you for posting all these tutorials!!! I just found this page and I am ever so grateful to you for offering these wonderful tutorials!!!
A brilliant tutorial - thank you so much. So glad I found your blog.
Great Tut! Thanks for sharing!
Postar um comentário